Install Oracle 19c for Windows
by Pradeep Rai, Oracle Database Administrator, Rackspace Technology
Overview
Oracle 19c Database® is the latest release of a widely adopted automationdatabase in the market and enterprises. Stability is an important element of theOracle Database 19c® component of the Oracle Database 12c (Release 12.2) ® family of products. In this series, I cover installing and upgrading version 19c.
I focus on installing Oracle 19c on a Windows® environment.You might wonder if you can install Oracle DB 19c on the x32 bit Windowsoperating system, but the answer is no. Oracle 19c is compatible with only x64bit Windows.
Installation steps
Perform the following steps to install Oracle 19c on Windows:
Execute the installation file
To prepare for the installation, perform the following steps:
1. Download the software WINDOWS.X64_193000_db_home.zip from the following link:
2. Extract the zip file D:\app\product\WINDOWS.X64_193000_db_home.zip and set the extraction folder to D:\app\product\19.0.0\dbhome_1, which is the Oracle 19C Home directory.
3. After the zip extraction completes, execute D:\app\product\19.0.0\dbhome_1\setup.exe** and perform the following
Step 1
Select the `Set Up Software Only` radio button because you want to install the software without creating an Oracle database. In my case, I already have an Oracle database version 11g.
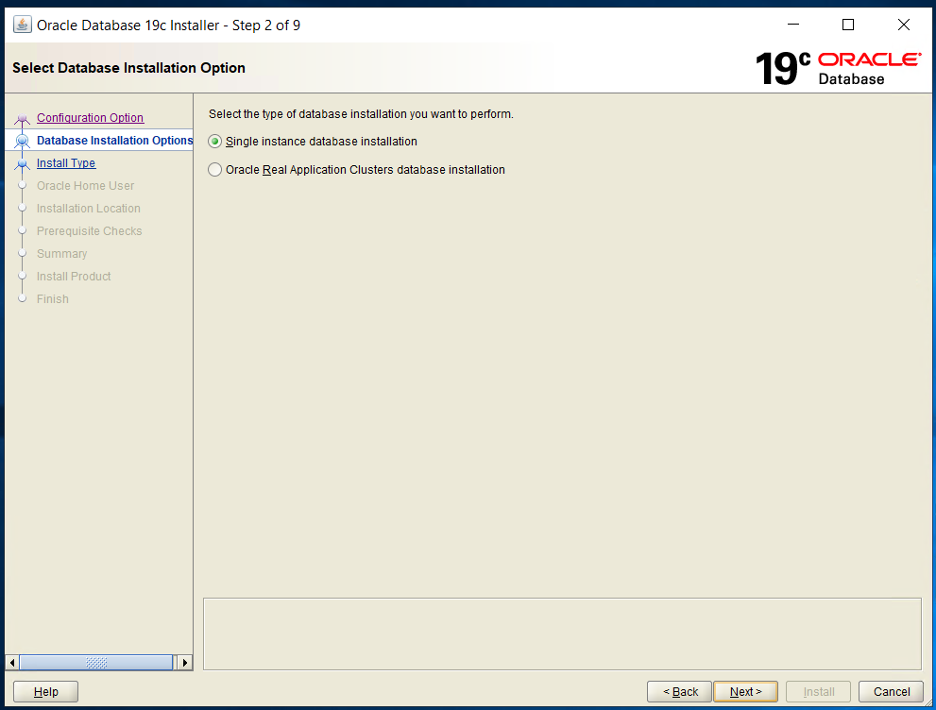
Step 2
Select the `Single instance database installation` radio button because you're not installing an Oracle Real Application Cluster (RAC) database, which can have multiple instances.
Step 3
Oracle Database 19c is available in the following editions:
- (EE) Oracle Database 19c Enterprise Edition
- (SE2) Oracle Database 19c Standard Edition 2
Select the radio button for `Enterprise Edition` to install the Enterprise Edition. If you want to install the standard edition, then select `Standard Edition 2`.The Enterprise edition has additional costs compared to the Standard edition, and the choice is up to you.
Step 4
Select the `Use Virtual Account` radio button. The Oracle home user can be a Windows built-in account, a virtual account, or a regular (non-administrator) Windows account. If you specify an existing user as the Oracle home user, the Windows user account you specify can either be a Windows domain user or a Windows local user. As an administrator, do not create a Windows user account if you use a virtual account or a Windows built-in account during the installation. For example, if you specify a non-existing user for the Oracle home user, the Windows user account you specify needs to be a Windows local user. The Oracle installer creates this account automatically to run the Windows Oracle services for the Oracle home.
Step 5
Specify the location of the Oracle base. In this case, I selected D:\app.Again, you can change this directory at your convenience or opt for the default one.
Step 6
The installer verifies all the prerequisites. If there are any errors, try to readjust the minimum installation requirements as follows and restart.
You can install Oracle Database 19c on the following Windows x64 distributions:
- Windows Server 2019 x64: Standard, Datacenter and Essentials
- Windows Server 2016 x64: Standard, Datacenter and Essentials and Foundation
- Windows Server 2012 R2 x64: Standard, Datacenter and Essentials
- Windows 10 x64 Pro: Enterprise and Education
- Windows 8.1 x: Enterprise
- Windows Server 2019 x64: Standard, Datacenter and Essentials
- Windows Server 2016 x64: Standard, Datacenter and Essentials and Foundation
- Windows Server 2012 R2 x64: Standard, Datacenter and Essentials
- Windows 10 x64 Pro: Enterprise and Education
- Windows 8.1 x: Enterprise
NOTE: You must update your operating system before starting the OracleDatabase installation to avoid any issues with Oracle 19c.
Click install if no error occurs.
STEP 7
The installer shows you the summary, including the Oracle base, Oracle software location, Oracle database edition, and Oracle home user.
Picture 8
The installer starts the Oracle 19c installation. If you get any errors during the installation, you need to fix them to complete the installation successfully.
Step 9
The installer shows you the final successful page with the following output if no errors occurred during the installation.
Conclusion
With the help of this blog post, you can easily understand and follow the Oracle 19c installation steps in the Windows environment.

Recent Posts
Escalado de personalizaciones de zonas de aterrizaje en AWS
Mayo 1st, 2025
Informe sobre el estado de la nube en 2025
Enero 10th, 2025
Patrones de redes híbridas de Google Cloud - Parte 2
Octubre 16th, 2024
Patrones de redes híbridas de Google Cloud - Parte 2
Octubre 15th, 2024


