


Recent Posts
Practical strategies for moving AI workloads from public platforms to private cloud
March 23rd, 2026
From Infrastructure to Intelligence in Regulated Enterprise AI
March 18th, 2026
AWS Cost Drift: The Operational Cause Nobody Talks About
March 17th, 2026
Transforming Your SOC From Reactive Monitoring to Strategic Defense
March 13th, 2026
Related Posts
AI Insights
Practical strategies for moving AI workloads from public platforms to private cloud
March 23rd, 2026
AI Insights
From Infrastructure to Intelligence in Regulated Enterprise AI
March 18th, 2026
Cloud Insights
AWS Cost Drift: The Operational Cause Nobody Talks About
March 17th, 2026
AI Insights
How Agentic AI Changes the Rules of Digital Sovereignty and Private AI
March 16th, 2026
Cloud Insights
Transforming Your SOC From Reactive Monitoring to Strategic Defense
March 13th, 2026
In part three, we continue setting up our networks by creating OpenStack routers, which route traffic between our private network/subnet to the internet.
In part three of "A User's Look at OpenStack Networking," we will continue setting up our networks by creating OpenStack routers, which route traffic between our private network/subnet to the internet.
Last week, in part two, we used OpenStack to build a network to enable connectivity for any virtual machines that we create. Part one introduced OpenStack networking concepts and described how to use the networking features in the OpenStack dashboard.
Creating a virtual router
Most of us know that installing and configuring a router is usually the job of a network specialist, not something we’d want to tackle on our own. It includes activities such as setting IP addresses on the various interfaces, setting up and verifying the routing tables and configuring the Network Address Translation tables between our internal subnets and the outside world as well as the needed firewall rules. This is complicated and requires a deep understanding of networking.
Fortunately, OpenStack buffers us from all of these complexities. Creation and configuration of our virtual routers under OpenStack is surprisingly straightforward, as you will see, because OpenStack takes care of all of the difficult parts of managing a router.
We just create the router, add the subnet interfaces to the router and add the external gateway/network into the router using simple OpenStack commands or the OpenStack dashboard and OpenStack does the rest. It:
- connects the interfaces to the router,
- sets all of the interface IPs,
- gets and sets a public IP on the external interface and
- builds the NAT tables for us.
So, let’s get started. As we did in the previous posts, we will use the OpenStack web interface to build everything. After logging into the dashboard, click in the left nav on the network line in the projects section, which will expand and show the routers option. After clicking on routers, we will see the Routers page:
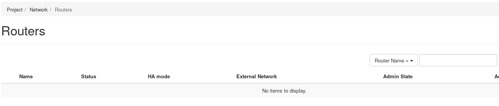
We can build our router by clicking on the Create Router button on the far-left side of the page. We get the create router popup:
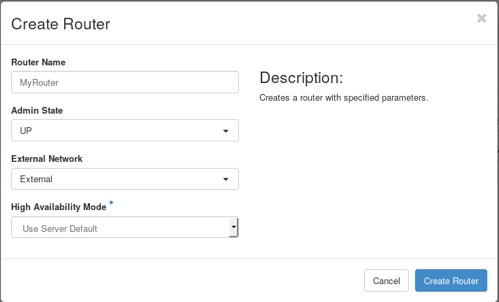
We need to give the router a name; I chose “MyRouter.” We can also connect it to our external network, named “External,” by selecting that network from the pull-down menu under the External Network box.
Now, by clicking on the Create Router button, OpenStack will create our router. We will return to the Routers page and our new router will be shown. The router name (MyRouter) is a hyperlink, clicking on it take you to a page that shows all information about our router:
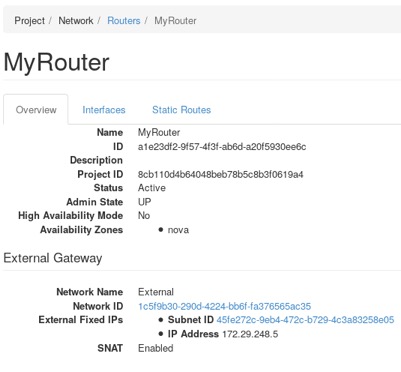
We now see that our router has a status of active and that the external interface has been configured with an available public IP in the External Gateway section. Also, at the bottom of this section, it shows that Source Network Address Translation (SNAT) is enabled, so that once we add our private subnet into the router, the SNAT table will be created and it will be able to route traffic.
The last task is to add the private subnet as an interface to the router. Clicking on the Interfaces tab will show us the configured interfaces. There should be one — that of our external interface. We need to add our private interface, so click on the Add Interface button on the far left. This will give us the Add Interfaces popup:
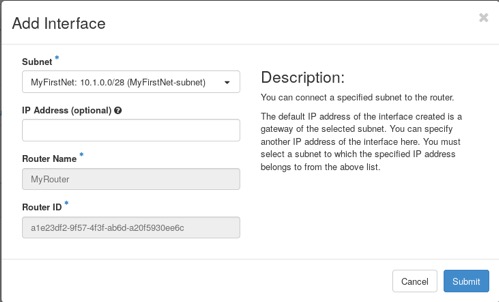
Now, select the private subnet (MyFirstNet-subnet) from the pull-down menu under the Subnet heading. Clicking on the Submit button will cause our subnet to be added into the router. We will be returned to the Interfaces page and our private subnet will appear as one of the interfaces in the router. It will be the one showing Internal Interface under the Types column. Since we weren’t able to name the interface when we created it, OpenStack will use the first 10 characters of its UUID as its name.
We can examine this new interface by clicking on the hyperlink, which is the interface name. We now see the page as shown below (your interface name will be different):

The assigned IP address must be the gateway address for our subnet under the Fixed IPs block and the status should show Active in the top section.
Now wasn’t that easy? OpenStack configured all of the hard parts for us; we didn’t have to configure everything manually on the router.
But we aren’t finished configuring things quite yet. We’ll need to set up our security group rules (think firewall rules) to allow traffic to the subnet. Finally, after we create an instance, we will give it a floating IP, so our server can be accessed from the public internet. That will be for next time.
This concludes part three in our OpenStack Networking series. In the first article, we covered OpenStack network concepts, including subnets, ports, and routers, then in our second we created and examined a virtualized network and subnet. In this post, we created a router and connected it to our internal private network and to the external public network.
We are getting close to being able to use it. In part four, we will modify the firewall rules to allow outside access to our network and then close the series by adding a public IP to an instance on our network.
Rackspace is the world’s leading OpenStack service provider. To learn more about OpenStack, attend a public training session or schedule a private training class with our experts. For a complete schedule of class offerings, please visit the Rackspace Training page.
Tags: